Saturday, December 27, 2014

How to Connect to a Database through SQL Developer in MS Window

Prerequisites:

  • Oracle SQL Developer installed on the machine. If not installed already then download it from Oracle website and install. Note that SQL Developer requires Java JDK already installed on the machine.
  • The database should be up and running

Step 1: Setting TNS_ADMIN environment variable

TNS Admin (TNS_ADMIN) environment variable should be set to the directory where tnsname.ora file resides i.e C:\app\Administrator\product\11.2.0\dbhome_1\NETWORK\ADMIN in our case
To setup this variable:
  1. Open the My Computer properties (Start > My Computer - Right Click and choose properties), Advance System Settings, Environment Variables. 
  2. Then create a new system variable with variable name as TNS_ADMIN and value as C:\app\Administrator\product\11.2.0\dbhome_1\NETWORK\ADMIN. Note that this the oracle home might be different in your case depending upon how you have installed the Oracle Database Application.

Step 2: Updating tnsnames.ora and listener.ora files

Both the tnsnames.ora and listener.ora should have the entry for SID or Database Name to establish connection with database.

PeopleSoft HRMS Online Training

Lets say the SID for our database is HRDEMO, this is how the tnsnames.ora and listener.ora located under \NETWORK\ADMIN will be updated (highlighted in red):

tnsnames.ora
# tnsnames.ora Network Configuration File: C:\app\Administrator\product\11.2.0\dbhome_1\network\admin\tnsnames.ora
# Generated by Oracle configuration tools.

LISTENER_ORCL =
  (ADDRESS = (PROTOCOL = TCP)(HOST = localhost)(PORT = 1521))


ORACLR_CONNECTION_DATA =
  (DESCRIPTION =
    (ADDRESS_LIST =
      (ADDRESS = (PROTOCOL = IPC)(KEY = EXTPROC1521))
    )
    (CONNECT_DATA =
      (SID = CLRExtProc)
      (PRESENTATION = RO)
    )
  )

ORCL =
  (DESCRIPTION =
    (ADDRESS = (PROTOCOL = TCP)(HOST = localhost)(PORT = 1521))
    (CONNECT_DATA =
      (SERVER = DEDICATED)
      (SERVICE_NAME = orcl.0.2.15)
    )
  )

HRDEMO =
(DESCRIPTION =
  (ADDRESS = (PROTOCOL = TCP)(HOST = localhost)(PORT = 1521))
    (CONNECT_DATA =
      (SERVER = DEDICATED)
      (SID = HRDEMO)
    )
)


listener.ora

# listener.ora Network Configuration File: C:\app\Administrator\product\11.2.0\dbhome_1\network\admin\listener.ora
# Generated by Oracle configuration tools.

SID_LIST_LISTENER =
  (SID_LIST =
    (SID_DESC =
      (SID_NAME = CLRExtProc)
      (ORACLE_HOME = C:\app\Administrator\product\11.2.0\dbhome_1)
      (PROGRAM = extproc)
      (ENVS = "EXTPROC_DLLS=ONLY:C:\app\Administrator\product\11.2.0\dbhome_1\bin\oraclr11.dll")
    )
    (SID_DESC =
      (SID_NAME = HRDEMO)
      (ORACLE_HOME = C:\app\Administrator\product\11.2.0\dbhome_1)
    ) 
  )

LISTENER =
  (DESCRIPTION_LIST =
    (DESCRIPTION =
      (ADDRESS = (PROTOCOL = IPC)(KEY = EXTPROC1521))
      (ADDRESS = (PROTOCOL = TCP)(HOST = localhost)(PORT = 1521))
    )
  )

ADR_BASE_LISTENER = C:\app\Administrator\product\11.2.0\dbhome_1
DIRECT_HANDOFF_TTC_LISTENER=OFF


Step 3: Restart the TNS Listener (OracleOraDb11g_home1TNSListener)

Open the Windows Services utility from Start > Run > services.msc and start the TNS Listener if its not started already. If already started, then stop and start back again.

Step 3: Establishing Connection through Oracle SQL Developer


  1. Start the database HRDEMO, to know how to start the database visit this article Connecting and Starting the Database through sqlplus Command
  2. Launch the SQL Developer by executing the binary from <SQL Developer Home>\sqldeveloper.ext.
  3. Open the new connection window by clicking on + sign on top left as shown below:Creating a New Connection in SQL Developer
  4. Enter the Connection Name HRDEMO, User Name - SYSADM, Password - SYSADM. Select the option 'Save Password', Role - Default, Connection Type - TNS. Finally select the Network Alias - HRDEMO. Note that SYSADM is the Access ID that we created while completing the database setup.
  5. Click on Test Connection, if the connection was established then the status on bottom left of this window will show as 'Success', if not then error message will be thrown. Click on Save to save the connection.
  6. If the connection was successful then click on Connect which will establish connection with the database HRDEMO and open the SQL Editor to write/execute SQL queries on this database.


Want to learn PeopleSoft technical module thoroughly? I have several videos with total duration of over 50 hours.


Following is the link to the YouTube videos Technical
Click here to see course contents

Click here to know how it works

However, if you want to save money by purchasing whole module instead of in parts then visit this page to get more details PeopleSoft Functional and technical online training

Connecting and Starting the Database through sqlplus Command Utility

Assuming that we have a database (SID = HRDEMO) created and now we need to start it from DOS command line, follow below steps to do so:

PeopleSoft HRMS Online Training


Step 1: Start the windows service created for oracle database HRDEMO

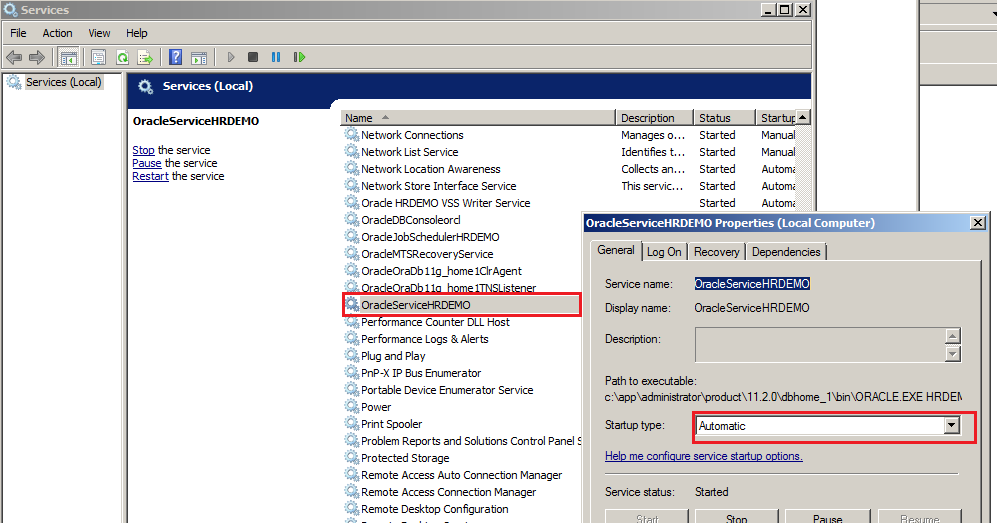
  1. Check if the service OracleServiceHRDEMO has been started in Windows Service Manager (Start > Run > Services.msc)
  2. Right click on the service OracleServiceHRDEMO, open the properties and change the Startup Type to Automatic
Start the configure the windows service for Oracle Seed Database

    3.  Again right click on OracleServiceHRDEMO and click on Start to start the service.


PeopleSoft HRMS Online Training

Step 2: Start the database through sqlplus command

  1. Open the MS DOS Command prompt
  2. Set the Oracle SID to HRDEMO by executing the command-  set ORACLE_SID=HRDEMO. Remember there shouldn't be any space around =
  3. Login as sysdba by executing the command-  sqlplus / as sysdba which will open the SQL command line
  4. Execute the command startup to start the database HRDEMO. The comand executed in this part are shown below:                                                                       


  5. As  you can see the database HRDEMO has started and the SQL command prompt has opened.


Want to learn PeopleSoft technical module thoroughly? I have several videos with total duration of over 50 hours.


Following is the link to the YouTube videos Technical
Click here to see course contents

Click here to know how it works

However, if you want to save money by purchasing whole module instead of in parts then visit this page to get more details PeopleSoft Functional and technical online training
PeopleSoft Installation Made Extremely Easy: Part 5

Setting Up PeopleSoft Pure Internet Architecture (PIA)


Step 1: Installing the PIA

The location where you install the PeopleSoft Pure Internet Architecture is referred to in this documentation
as PIA_HOME. To install the PeopleSoft Pure Internet Architecture on Oracle WebLogic:
  1. Go to \setup\PsMpPIAInstall and run setup.bat.
    Click Next on the Welcome to the InstallAnywhere Wizard for PeopleSoft Internet Architecture window.
  2. Enter the location where you want to install the PeopleSoft Pure Internet Architecture, referred to in this documentation as PIA_HOME which should be same as PS_CFG_HOME i.e C:\app.
  3. Select Oracle WebLogic Server and click Next.
  4. Specify the root directory where Oracle WebLogic is installed, WLS_HOME i.e C:\app\WLS1034, and   click Next.
  5. Enter the administrator login ID and password for the new domain to be created.
  6. The password must be at least 8 alphanumeric characters with at least one number or special character. The default login ID is system, and the default password is Passw0rd (with a capital “P” and zero rather than the letter “o”). It is good practice to change to a password other than the default. Click Next.
  7. Enter the Weblogic Domain HRDEMO and click on next.
  8. Select the type of domain to Create Single Server
  9. Enter a PeopleSoft web site name; the default is ps so don't change it.
  10. Specify your Application Server Machine Name (WIN-5TI0P2TA3PE), its JSL (Jolt Station Listener) port number (9000), its HTTP (80) and HTTPS (443). All these parameters you can find in Part 4 Creating and Configuring the Application Server Domain for PIA and click Next.
  11. Enter the web profile DEV, User ID as PS and password as PS then click on next.
  12. Keep the default selection in next step and click on next.
  13. Take the screenshot of next window and click on Install.


Step 2: Starting the PIA 

  1. Go to \webserv\HRDEMO\bin i.e C:\app\webserv\HRDEMO\bin
  2. Run startPIA.cmd, wait until the PIA is started and server comes in RUNNING mode.

Step 3: Login into PIA

  1. Open the Internet Explorer and type following address in address bar http://localhost/ps/signon.html
  2. Enter the User ID as PS and Password as PS. You will be logged into PIA.

Step 3: Setup Process Scheduler

PeopleSoft Installation Made Extremely Easy: Part 4

Creating and Configuring the Application Server Domain

Its time to finally build the 4-tier architecture to be able to use PIA. Make sure that the environment variable TUXDIR is set to point Tuxedo home directory.


Step 1: Configure Application Server Domain

To configure application server domain, first make sure the database HRDEMO is up and running. If not then start it as shown in the article Connecting and Starting the Database through sqlplus Command
Once Database is started, follow below steps:
  1. Open the MS DOS Command Prompt, and change the directory to C:\PS_HOME\appserv by executing the command cd C:\PS_HOME\appserv.
  2. Execute the command set PS_HOME=C:\PS_HOME and  set PS_CFG_HOME=C:\app to set these two environment variables. There shouldn't be any space around '='
  3. Execute the command psadmin
  4. Press 1 and hit enter to configure Application Server
  5. Press 2 and hit enter to create domain then it asks for the domain name enter your database name HRDEMO(though its not necessary to enter database name you can enter any name, but makes sense when application domain name and database name both have same names.
  6. In the next step, it will ask to select the configuration template. Though you can select any one of them but for now select the fist one - Developer
  7. The next dialog will ask for confirmation, press 'y' and enter and this is what you see next:
  8.  Application Server Domain Configuration in PeopleSoft installation
  9. Now we have to change the UserID and UserPswd which appears at 18th and 19th number respectively however they might also appear at 17th and 18th number.
  10. Press 18 and hit enter to change the UserID. Enter the User ID as PS in next prompt and press enter.
  11. Press 19 and hit enter to change the UserPswd. Enter the User Password as PS in next prompt and press enter.
  12. We need to enable WSL, Press 6 and hit enter upon doing so the the option will change from No to Yes.
  13. Press 13 and hit enter to load the configuration. It will configure the app server domain once done the next screen will ask to boot the domain.
  14. Press 1 and hit enter to boot the domain, in the next screen choose 1 for serial boot for now and hit enter.
Your app server will start running now.


Step 2: Testing the Three-Tier Connection

Now that we have created an application server domain HRDEMO to connect to our demo database HRDEMO (Both have same name) in 3 tier mode, we need to verify this connectivity through app designer.

Before we begin doing so, we need to get the Host Name and WSL port on which Application Server Domain HRDEMO will listen the connection requests. In our case as you can see in the above screenshot, the WSL Port (at number 25) is 7000. To find out what will be host name, just start the application server domain and once started see the host name against WSL port 7000 at the bottom:


Host Name or Machine Name for Application Server Domain PeopleSoft Installation


 So the Host Name or Machine name is WIN-5TI0P2TA3PE.

Launch the configuration manager pscfg from C:\PS_HOME\bin\client\winx86. Create a desktop shortcut so that you don't have to go to this directory again and again:
1. Select the Profile Tab. Highlight Default and select Edit.
2. On the Edit Profile dialog box, select Application Server as the Connection Type.
3. Enter values for these parameters:

  • Application Server Name - HRDEMO
  • Machine Name or IP Address - WIN-5TI0P2TA3PE
  • Port Number (WSL) - 7000
  • Domain Connection Password - PS
  • Domain Connection Password (confirm) - PS
5. Click on Set to add the definition to the list and then click on OK to close the dialog box.
6. On the Configuration Manager dialog box, select the Startup tab.
7. Select Application Server from the Database Type list. Your application server name should be displayed.
8. Enter the values for User ID as PS, Connect ID as people, and password as peop1e.
9. Click OK. 


New Launch the app designer and login with userid/password as PS/PS.

We are done in this part, visit the next part - PeopleSoft Installation Made Extremely Easy: Part 5


PeopleSoft Installation made Extremely Easy: Part 3

Completing the Database Setup

Step 1: Update the Database to Latest PeoleTools Release

Your PeopleSoft application database may be on a PeopleSoft PeopleTools release prior to the version that you are currently running. For you to be able to sign on to your database after running the Data Mover script to load your database, the PeopleSoft PeopleTools versions for your database and your file server must match.
Login into the app designer with the userid PS and password PS, if you get a message like this:
The database is at release 8.51 . The PeopleTools being run the require database at release 8.52.

Then you have to upgrade the database.  This section is only applicable if you get the error message shown above but if you are successfully able to login into application designer through the user PS then directly go the next section in this part.

Run the below SQL query in SQL Developer:

SELECT TOOLSREL FROM PSSTATUS

Note that you can either run the query in SQL*Plus by connecting to database through sqlplus command as shown in the Section Verify Database Connection in Part 2 or you can use Oracle SQL Developer tool to do so. For more info on how to use SQL Developer as SQL editor for our demo database HRDEMO visit this article - How to Connect to a Database through SQL Developer in MS Window

If the PeopleTools version returned from above query is lower than 8.52 then perform below tasks:
  1. Connect to the database HRDEMO with Access ID- SYSADM. Follow the instructions given in the section Verify Database Connection in Part 2 to connect to the database HRDEMO through SYSADM.
  2. Run the script rel852n.sql located in \scripts directory. After this run the grant.sql script located in the same directory. Before running the grant.sql, modify it by replacing all the occurances of with people
  3. Now login into Datamover with the Operator ID- PS and run the script storeddl.dms located in \scripts directory.
  4. Logout from Datamover and login back with the Access ID- SYSADM which will start the Datamover in bootstramp mode and run the script msgtlsupg.dms located in \scripts directory. 

Step 2: Updating PeopleTools Database Objects

To update PeopleSoft PeopleTools database objects to the current release you must be in Application Designer.
To update PeopleSoft PeopleTools database objects:

  1. Launch Application Designer and sign on to your database with a valid PeopleSoft user ID.
    Select Tools, Copy Project, From File.
  2. In the resulting dialog box, change the import directory to PS_HOME\projects, select PPLTLS84CUR
  3. from the list of projects and click the Select button.
  4.  
  5. The Copy From File dialog box appears.
    Select all object types and then click the Copy button. When the progress window disappears, the project has been copied.


Repeat the above steps for the project PPLTLS84CURML and then PPLTLS84CURDEL and then patch as well.


Step 3: Altering PeopleTools Tables

To alter PeopleSoft PeopleTools tables:
  1. Launch Application Designer with a valid PeopleSoft user ID and sign on to the installed database.
  2. Select File, Open.
  3. Select Project, enter PPLTLS84CUR in the name dialog box, and click OK.
  4. Select Build, Project.
      The Build dialog box appears:
     

  5. Select Create Tables and Alter Tables in the Build Options region as shown in the example above (Create
  Indexes and Create Trigger will automatically be selected).
  6. Select Build script file in the Build Execute Options region.
  7. Click Settings.
    The Build Settings dialog box appears:


    Select the Scripts tab.
    9. Select Write Alter comments to script.
    10. Select the Alter tab and ensure that the Adds, Changes, Renames, and Deletes check boxes are   selected in
     the Alter Any region.
    Drop column if data present should be selected in the Drop Column Options region, and Truncate data if
    field too short should be selected in the Change Column Length Options region.
    Make sure that the option Alter by Table Rename is selected in the Alter Table Options region.
   11.Select the Create tab and ensure that the Skip table if it already exists, Recreate view if it already exists,
and Recreate index only if modified options are selected.
   Click OK.
   The Build dialog box reappears.
   13. Click Build.
   14. Click Close when the process is completed.
   15. Edit the generated SQL script for the correct tablespace names and sizing parameters if you are not
    using delivered PeopleSoft Tablespace names.
   16. Run the generated SQL script in your platform-specific query tool to bring your database structure in sync with the PeopleSoft PeopleTools tables.


Step 4: Migrating Records to New Tablespaces

Repeat the Step 2 for the project PT84TBLSPC


Step 5: Updating PeopleTools System Data

To update PeopleSoft PeopleTools system data:
  1. Login into Data Mover using the access ID (SYSADM) which will start in in bootstrap mode.
  2. Run the pslanguages.dms Data Mover script in the PS_HOME\scripts directory.
  3. Run the tlsupgnoncomp.dms Data Mover script in the PS_HOME\scripts directory.

    Now, open Data Mover using a valid PeopleSoft Operator ID (PS).
  4. If you are a Multilingual customer and have licensed non-English languages, run the pt852tlsxxx.dms
    scripts in the PS_HOME\scripts directory.
  5. Run the msgtleng.dms Data Mover Script in the PS_HOME\scripts directory.
  6. Non-English message data was loaded in the pt852tlsxxx.dms scripts. This will update the messages
  7. in your database.
  8. Run the ptstreng.dms Data Mover script in the PS_HOME\scripts directory.
  9. Run the storept.dms Data Mover script in the PS_HOME\src\cbl\base directory.
  10. Run the ptdefnsec.dms Data Mover script in the PS_HOME\scripts directory.
  11. Run the createvw.dms Data Mover script in the PS_HOME\scripts directory.
Step 6: Running PeopleTools Conversions
Run the UPG844PORTAL Application Engine program on your database. From the DOS command line,
the syntax is:
\bin\client\winx86\psae -CD HRDEMO -CT ORACLE -CO PS -CP PS -R INSTALL -AI UPG844PORTAL

Similarly run all the following programs programs with the same syntax as shown above, just replace the last parameter with these program names one by one:

UPGQRYDUPHED
UPGPT850PTFP
UPGPT852PTFP 
UPGPT848IBUG
UPGPTSERVOPR

We are done here, visit the next part - PeopleSoft Installation Made Extremely Easy: Part 4

PeopleSoft Installation Made Extremely Easy: Part 2

Creating and Configuring the Database

In this part we will be creating Database for our PeopleSoft application and before we begin going so we must have the Oracle Database Server, PeopleTools 8.52 and PeopleSoft HCM 9.1 Installed in our system as mentioned in the part 1 -
There are two types of databases we create in PeopleSoft:

System: The System database has no company specific data and can be used to load your data and
begin development of your production database. This is the database which is chosen when PeopleSoft where company intend to load the live production data and perform the developments.

Demo: The Demo database contains data for a sample company, and can be used immediately for
demonstration. This one will be most suitable for us because with the sample data for a company already available we as an individual can use it for our PeopleSoft training.

So Let's get down to the business and create the database for our PeopleSoft installation.

Step 1: Creating Windows Service for the Database

Since we are going to use the term SID everywhere in this article so let me explain you first that an SID is unique System Identifier for a particular database. Since, in our case we are going to create a demo database so we will create an SID for it with the name HRDEMO. It's not mandatory to have this name, you can choose your own name but the point is, SID should be meaningful so that it reflect the purpose of database for which it's being created.
Once we have decided the SID for our demo database, we need to create a window service for it. so follow below steps:
  1. open the command prompt
  2. run the following command -   oradim -NEW -SID HRDEMO
  3. Check if the service OracleServiceHRDEMO has been created in windows service manager (Start > Run > Services.msc)
  4. Right click on the service OracleServiceHRDEMO, open the properties and change the Startup Type to Automatic and then start the service.

Step 2: Creating oracle initialization  parameter file (initHRDEMO.ora) 

When the Oracle database is started, one of the first things it needs to do is read the database initialization parameter file initHRDEMO.ora. The parameter file defines the overall instance configuration, such as how much memory should be allocated to the instance, the file locations, and internal optimization parameters.

Do following steps to create initHRDEMO.ora file
  1. Go to  ORACLE_HOME\dbs and open the existing file init.ora and create a copy of it with the name initHRDEMO.ora by Save As option.
  2. Replace all the occurrences of with your oracle base directory i.e - C:\app\Administrator 
  3. Replace the existing SID- 'ORCL' on the db_name with your new SID- 'HRDEMO'
  4. Replace the 'UNDOTBS1' on the undo_tablespace with the Table space present in createdb10.sql at C:\PS_HOME\scripts\nt
  5. Once the above changes are done in the file initHRDEMO, save it and move it from the current directory \dbs to the directory \database
Now, create a folder HRDEMO under the directory \admin and then create three sub folders inside HRDEMO named - adump, dpdump, pfile.
Also, create a folder HRDEMO under the directory \oradata.


Step 3: Configure and Execute the delivered SQL Scripts

We need to modify and then execute several delivered SQL scripts located in \scripts\nt

createdb10.sql
  1. replace with HRDEMO
  2. replace with C:\app\Administrator i.e
  3. replace %ORACLE_HOME% with C:\app\Administrator\product\11.2.0\dbhome_1
utlspace.sql
  1. Add follwing command in the beginning:  set ORACLE_HOME = C:\app\Administrator\product\11.2.0\dbhome_1
  2. replace with HRDEMO
  3. replace with C:\app\Administrator

dbowner.sql
we don't have to make any changes in this script

hcddl.sql
  1. replace with HRDEMO
  2. replace with C:\app\Administrator

psroles.sql
we don't have to make any changes in this script

psadmin.sql
Add following command in the beginning:  set ORACLE_HOME = C:\app\Administrator\product\11.2.0\dbhome_1

connect.sql
we don't have to make any changes in this script

Once the scripts have been modified, its time to execute them. Follow below steps to do the same:

1. Open the dos command prompt and set the ORACLE_SID be executing below command. Make sure  that there is no space around '='
       set ORACLE_SID=HRDEMO

2. Now we need to connect to our dummy database by executing below command:
       sqlplus / as sysdba

3. Once connected, run the blow command to startup the dummy instance:
       SQLgt; startup

4. Once the dummy instance has started, execute createdb10.sql as shown below:

       SQL>@C:\PS_HOME\scripts\nt\createdb10.sql

Execute all the other scripts in the same fashion. Note that the scripts should be executed in following order:


Createdb10.sql  >> utlspace.sql >> dbowner.sql >> hcddl.sql >> psroles >> psadmin.sql >> connect.sql

While executing the script psadmin.sql you will be prompted for an PeopleSoft Owner ID and Password and Default Tablespace. Please provide following for the same:
  • PeopleSoft Owner ID - SYSADM
  • Password - SYSADM
  • Default Tablespace - PSDEFAULT

Step 4: Update the Connection Information for Database

Now that we have created the database and created the necessary tablespaces and tables with appropriate roles to be able to login via data mover. But before we could login into this newly created database we need to define connection information in tnsnames.ora and listener.ora files.
Check out the Step 2 Updating tnsnames.ora and lister.ora File  in the article How to Connect to a Database through SQL Developer in MS Window to know more about how to update tnsnames.ora and listener.ora files.

Now, since we have made changes in these two files we have to restart the TNS Listener service to get the changes in the effect and to do that:

Open the DOS command prompt and execute below:
  1. Execute the command-  lsnrctl stop
  2. Once the TNS Listner has stopped, restart it back again by executing the command-  lsnrctl start


Step 5: Verify the Database Connection

Now that we have updated the connection information, its time to establish the connection via sqlplus command line. We are doing so to ensure that Access ID (SYSADM) and Connect ID (people) are able to connect to the database so that while loging into database through Data Mover we don't face any issue.


  1. Start the Database HRDEMO as shown in the the article Connecting and Starting the Database through sqlplus Command
  2. Connect to the database HRDEMO through Access ID (SYSADM) by executing-  connect SYSADM/SYSADM
  3. Disconnect from HRDEMO by executing-  disconnect
  4. Now connect to the database HRDEMO through Connect ID (people) by executing-  connect people/peop1e.  Note that in the Connect ID password there is a number 1 and not the letter l.

Step 6: Running Data Mover Import Scripts

In this step we will be running the Data Mover import scripts to complete the database setup for our PeopleSoft installation.

First configure the connection information in PeoleSoft Configuration Manager through the following steps:
  1. Create a desktop shortcut of the PS Configuration Manager executable pscfg which is located at \bin\client\winx86
  2. Open the configuration manager by running pscfg
  3. Select Oracle as the Database Type
  4. Enter HRDEMO as Database Name
  5. Enter people as Connect ID
  6. Enter peop1e as Connect Password, confirm the connect password.
Setting up connect ID in PeopleSoft Configuration Manager


Running Data Mover Import Script for our Demo Database:

  1. Launch the Data Mover (Start>Data Mover or \bin\client\winx86\psdmt)
  2. Login with user SYSADM and the password also SYSADM
  3. Go to File > Database Setup
  4. Select the Target Database as Oracle and Database Type Non-Unicode and click Next
  5. First select the Database Type as Demo and then click on Add button to select the database for which the Data Mover script is to be created.  Click on Next                                                                 
  6. In the next window keep the selection but make sure that the Access Password is SYSTEM. Click on finish to create the Data Mover script.
  7. Once the script is created, click on Run to run the script.             
  8. The script will take several hours (5-6 hours or may be  more) to complete so keep patience and do not close Data Mover until the script completes. If Data Mover appears not responding or kind of stuck then don't worry, the script is running. You can see the log files located under C:\PS_HOME\log to track the progress on the script execution.
  9. There is on more script grant.sql located under C:\PS_HOME\scripts that we need to run in Data Mover but before doing so we need to modify it. Just open this script and replace the with people then run the script.
With this we have successfully run the Data Mover import scripts to load the database HRDEMO with necessary data.

Visit the next part - PeopleSoft Installation made Extremely Easy: Part 3