Monday, December 15, 2014

POI Security in PeopleSoft

Before you learn what POI security is, you must know how a POI is created and that has been explained in the following article - Adding and Maintaining Person Of Interest in PeopleSoft. Steps explained in Case 2 in the previous article show us how to create a POI without JOB record and we have created one too (EMPLID – ST01ST20).

PeopleSoft HRMS Online Training

Security for POIs without Jobs


Let’s try to supply some more details about this POI through the component “Maintain a Person’s POI Reltn”, this is also called maintaining POI relationship.

Open the component “Maintain a Person’s POI Reltn” (Navigation: Main -> Workforce Administration -> Personal Information -> Organizational relationships -> Maintain a Person’s POI Reltn), Enter the EMPLID – ST01ST20 then click on search. 


Oops, employee doesn’t exist?

The answer would rather be, Employee exists with POI type “AUS – Non Paid Intern” but the user who is trying to access it, doesn’t have access to the POI. It means that PeopleSoft secures POI’s data under the Security Set – PPLPOI (People without Jobs) and corresponding Security Type  hence users who doesn’t have access to this POI type won’t be able to see this POI.


Providing POI Access to Users


    Step 1: Get the permission list for row security tagged to the user from user profile page” (Navigation: Main -> PeopleTools -> Security -> User Profiles-> User Profile).


Step 2: Go to the “Security by Permission list” component (Navigation: Main -> Set Up HRMS > Security > Core Row Level Security > Security by Permission List)
a)      Give the row security permission list copied (Step :1) and open the details.
b)      Navigate to the security set – “PPLPOI” (People without jobs), as you can see below this permission list has access to none of the POI types.

Step 3:  Give the permission list access to the POI type “AUS-Non Paid Intern”

a)      Select the security access type “Person of Interest type” from the first prompt.
b)      Select the POI type (AUS-Non Paid Intern) from the second prompt and click on save.


       Step 4: Verify if the user now has access to the POI which we added (EMPLID – ST01ST20).
a)      Open the “Maintain a Person’s POI Reltn” component for this person (Navigation: Main -> Workforce Administration -> Personal Information -> Organizational relationships -> Maintain a Person’s POI Reltn)
b)      Enter the EMPLID – ST01ST20 and click on search, Now you would get a row for this person.
c)       Click on the row to open the component. 
 Done, access to this POI has been granted to the user.

Security for POIs with Jobs


POIs with JOB record are secured in the same way as EMP and CWR are secured, and it has been explained in other articles in detail. You might also want to visit Peoplesoft Row Level Security Search Records

Maintaining POI Relationships


We maintain the POI relationship through the component “Maintain a Person’s POI Reltn” (Navigation:  Main -> Workforce Administration -> Personal Information -> Organizational relationships -> Maintain a Person’s POI Reltn)
   From this component we can:
1)      Add additional security criteria by assigning the person to one or more business units, locations, or institutions.
To do this, add the corresponding business unit and location access types in the “Data” grid.
 

Now, the following user will have access to this POI:

  User A, who has access to the POI type “AUS-Non Paid Intern”
  User B, who has access to the POI type “AUS-Non Paid Intern” in the business unit “AUS01”
  User C, who has access to the POI type “AUS-Non Paid Intern” in the location “6100”

2)      We can mention the planned exit date for POI and couple of other information’s. 

Once we have mentioned the addition security criteria, we can grant access to the users on this POI at Business unit/Location level instead of POI type. To do this, follow the same steps given earlier in the para   “Providing users with access to Person of Interest or POI types”.


As shown above, select security access type - POI Business Unit or POI Location, and depending upon this selection select the other keys (Key1, key2..etc).


You can gain in-depth knowledge on PS Security with a live example. I have a complete session in 6 parts that covers all the aspects of PS Security


Below is the link to videos in YouTube.
PS Security

Click here to see the course contents
Click here to know how it works

However, if you want to save money by purchasing whole module instead of in parts then visit this page to get more details PeopleSoft Functional and technical online training

Sunday, December 7, 2014

Difference Between FieldEdit and FieldChange Event in PeopleSoft

Just like other PeopleSoft events these two are also very confusing for freshers even though there are numerous articles out there in the internet. Nevertheless, PeopleSoft events are one of those key areas where we should have very clear understanding so that we can easily determine where and how they should be used in the development.
I am gonna make it extremely simple for you guys to understand significance of the PeopleSoft events FieldEdit and FieldChange and further down the road I am gonna cover other events as well.


PeopleSoft FieldChange Event:

Have you ever noticed what happens when you change the position of an employee in Job Data > Work Location page. As soon as you change the position number and tab out from the field, the Regulatory Region, Company, Business Unit, Department etc... also change accordingly.

But how did it happen ?
The answer would be -The FieldChange event associated with the Field 'Position Number' gets executed and affects other fields whenever user changes the Position Number and tabs out from the field.


Let's see another example:

why do we use FieldChange event in PeopleSoft


When you change the value in Standard Hours field (Job Data > Job Information) and tab out, the field FTE also gets changed. 

Again the same question, how did it happen ?
The answer would be -The FieldChange event associated with the Field 'Standard Hours' gets executed and affects FTE whenever user changes the Standard Hours and tabs out from the field.

PeopleSoft FieldEdit Event:

Let's observe the behavior of the field Standard Hours once again when we change it's value to zero and tab out:


why do we use FieldEdit event in PeopleSoft

Well, it's different from what we saw earlier. When the user changes the field value to zero and tabs out, it turns red and an error message is thrown. This is because the event FieldEdit associated with the field Standard Hours does a validation and throws error/warning if the value entered is not what it supposed to be each time the field value is changed and tabbed out.

PeopleSoft HRMS Online Training

Conclusion:

The similarity between FieldChange and FieldEdit is they both are field level events which means they get fired whenever the field value on which these events are written, is changed and the cursor is tabbed out from the field. 

The difference between these two events is:
FieldChange event is used where you want to change other fields in response to when another field is changed. Just like we changed the fields Regulatory Region, Business Unit, Department etc.. in response to when Position Number is changed or we changed the field FTE in response to when Standard Hours is changed.
But FieldEdit event is more of a validation event used to validate the value entered in a field and throw error/warning if the value is not what is supposed to be when the cursor is tabbed out. Just like the system thrown error when Standard Hours are made zero and cursor tabbed out. This event wont allow the user to save transaction unless and until the appropriate value isn't provided in the field and the validation is success.

PeopleSoft HRMS Online Training

Saturday, December 6, 2014

Creating an Organizational Relationship in PeopleSoft

I would like to mention here that we are in the process of hiring a person in PeopleSoft (Hiring a Person in PeopleSoft) and in this quest we have so far added the biographical details of the person through Add a Person component. We have a choice to stop here and save the transaction and the person will be saved as a POI Type without Job record. For more details on POI please visit Adding and Maintaining Person Of Interest in PeopleSoft


So the next step is to create an organizational relationship (or Organizational Instance) for this person. The Organization Relationship (Employment, Continent Worker  or POI) can be created in two ways:

  1. From 'Organizational Relationships' page of the component 'Add a Person'
  2. From the dedicated components Add an Employment Instance, Add a Contingent Worker Instance, Add a POI Instance to add EMP, CWR and POI instance respectively.
In the first method, we can create organizational relationship while adding biographical details of a person. We can also choose the checklist which has to be assigned to this person. We need to click on the button 'Add Relationship' which will open the 'Add Employment Instance' component.


How to add Organizational Relationship in PeopleSoft
The reason we are assigning checklist here, because as I mentioned in the beginning that we need to track the progress of the steps in the hiring process. More details on checklists is given in the following sections.

The second method is used in the cases when there is such a person for which we have the biographical details but we don't have organizational details yet so we just add person's biographical details through Add a Person component and then later on when we the organizational details are with us then we can add an organizational instance for that person. We will add the organizational instance Employee (Also called Employment Instance) for the person through method 1 so lets click on the button 'Add Relationship' after selecting 'Employee' check box and a Checklist. Note that if we choose to select the checklist in this page then we don't need to assign the checklist in the page 'Person Checklist' (Navigation: Main > WFA > Personal Information > Organizational Relationship > Person Checklist)

As soon as the button 'Add Relationship' is clicked, the Add Employment Instance page opens:


Work Location Tab


Add organizational details in Work Location Page in Job Data component in PeopleSoft

This page is essentially used to define the location where the employee is working like, Business unit, Reg Region, Department,  Location etc..
Well, I don't need to explain each and every field over here as their name suggest everything however, what I need to explain is the fields with which most of us are unfamiliar.
If the organization is using full position data management and if we assign a position number to the employee in this page then most of the fields across this component are auto filled from the Position Data page. For more details on this particular part visit - 'Override Position Data' and 'Use Position Data' Option in Job Data Page
.


Expected Job End Date Field

Almost all the organizations hire freshers and keep them on probation (for 1 year, 6 months, 3 months etc..)while they are going through training. So, at the time of hiring, HR users mention a date in this field which indicates that the employee will not be confirmed if he/she doesn't complete training (Probation) successfully by this date. 
Another example would be, the contractors who are working with an organization for a certain duration and their contract will be terminated after that so in this case, when these contractors are added, the HR users mention the expected job end date.


Job Information Tab

Adding Organizational details in Job Information Page in Job Data component

We use this page to add the details pertaining to Employee's job like whether its a part time or full time, regular or temporary, standard hours in a work period etc...
Again, most of the fields in this page are auto filled from the Position data and they are quite clear by their names however, I would like to explain few of them here:

Regular/Temporary and Full/Part Fields 

Visit this page to get the details on these fields - https://peoplesoftconcept.blogspot.com/2014/08/part-time-full-time-regular-temporary-and-contractor-in-peoplesoft.html

Standard Hours, Work Period and FTE fields

Visit this page to get the details on these fields - How the FTE is Calculated in PeopleSoft

Employee Class field

Visit this page to get the details on these fields -https://peoplesoftconcept.blogspot.com/2014/09/employee-class-emplclass-field-in.html

Contract Administraion


Visit this page to understand the Contract Administration in PeopleSoft - 

Payroll Tab


Adding payroll information in Payroll page in Job Data component


In this page we essentially add the payroll related information for the new hire such as Payroll System, Absence System. If organization has license for PeopleSoft delivered payroll and absence solution and if they are using them then we will make the choice here accordingly and based on this selection other details like Pay Group, Employee Type (Salaried or Hourly etc...) will be provided. One important thing to note here is, when we select Pay Group the Employee Type field is auto filled because in Pay Group setup page we mention the default Employee Type for which this pay group will be applicable.


Holiday Schedule Field

Every organization defines an holiday schedule every year for each country where their operation is,  where all the holidays falling in a particular year are added. For example, in India we have 10 holidays in a year. Once the schedule is defined, it is assigned to the employees through this field belonging to that country and then system takes these holidays in consideration during payroll processing. The holiday schedules are defined from Setup  HRMS > Product Related > WFA > Absence > Holiday Schedule Table


Salary Plan Tab


This page is typically used to define the Salary Administration Plan details like Sal Admin Plan ,Grade and Step. These fields are auto filled from position data if the details have been provided there. I have never used the section 'Military' so I won't be comfortable explaining it.

A grade can have different ranges of compensation in different geographies hence we always tie Salary Admin Plan with Grade.
For more details on Salary Admin Plan, Grade and Step visit -


Compensation Tab


This page is used to define compensation details for an employee. Nothing much to explain here, we just need to add the Pay Components for a Person in the Grid 'Pay Components' below. After that we must click on the button 'Calculate Compensation' to reflect the final compensation after calculation.

For example, in India we have various pay components:
  • Basic
  • HRA
  • Special Allowance
So, we will add a row for each of these pay component and the Comp Rate associated with it.
Once the compensation details are also provide, finally click on Save button to save the transaction and after the transaction is saved i.e the organization relationship is added for the person, the next step is to go through the remaining process.

Understanding PeopleSoft Checklists

We are in the process of hiring a person in PeopleSoft (Article - Hiring a Person in PeopleSoft) and so far we have added the person through Add a Person component and the organizational relationship through Add an Employment Instance component for this person. The information that we have provided have been stored in various tables but this is not the end of it. We Still have to do whole lot of other things to complete the hiring of this person.

PeopleSoft HRMS Online Training

As I mentioned in the beginning, there are various steps in hiring process or in other words, there are things need to be completed post joining such as:
  • Educational document submission and verification
  • Passport details
  • Relieving letter, Exp Letter Submission
  • Updating bank information
  • Updating Emergency Contact Details
  • Permanent Address Proof
  • Update Dependent/Beneficiary Details
But how do we keep track of these steps during hiring process ?
The answer is checklist. A checklist is nothing but list of items needed to be acted upon when assigned to a person.
We can create checklist for New Joiners, Transfers, Terminations, Contractors etc...
If you remember, we had assigned a checklist to this person when we were about to add organizational instance for this person. Thats the one way of doing it.
Another way is, don't assigned the checklist to person at the time of adding into PeopleSoft instead, assign the checklist after the person is added in which case we have to use Person Checklist page (Navigation: Main > WFA > Personal Information > Organizational Relationship > Person Checklist) both are same.
Now, since the checklist is already assigned lets open the Person Checklist page and see what are all the steps yet to be acted upon in the hiring process.


As you can see above, few steps are completed, few have been initiated while for others the required documents have been received and that's how we track the progress. The steps which are not yet completed such as Bank Information, Emergency Contact Details, HR can click on the link given and it will open the respective Page where the details has to be provided.

For example, If HR clicks on the link Emergency Contact Details, it will open the Emergency Contact page where the contact details can be provided.

Creating a Content Reference in PeopleSoft


In this article we going to learn how to create the navigation for the Query Report which we are talking about 
Since we now have the PS Query (TEST_QUERY_NEWHIRE) ready for the report. It's security configuration is also done so now we need to create a content reference in the portal from where the report will be run. Open the Query manager (PeopleTools > PS Query > Query Manager) again and search for the query that we have created:


Click on the link HTML as highlighted above, to open the run control page for this report in web browser:

Copy highlighted part of the URL displayed in the browser as shown above, and open the 'Structure and Content' page from the navigation - PeopleTools > Portal > Structure and Content. Go to the path Root > My Reports > Query Reports as shown below:


Click on the link 'Add Content Reference' as highlighted above to create a new content reference:


Paste the part of the URL which you copied from the browser in the beginning of this section and click on Save. The content reference is now created and with this everything is done. Now all we need to do is run the report. 

Security Configuration for PS Query in PeopleSoft

Before you learn how to secure PS Query, you must learn how to create a PS Query - Creating the PS Query in PeopleSoft

This is very important part in PS query development. It simply means that when we create PS query in PeopleSoft, we have to secure it so that only intended users can have access to it. Securing PS query means securing the records used in it by adding them into an appropriate tree and the records in our case are JOB and NAMES but since these are very common delivered records hence it is quite obvious that they would already have been used in other queries which means that they are already secured. We don't need to secure them but still its very important to understand that how exactly this is done.

Open the component 'Query Access Manager' (Navigation: PeopleTools > Security > Query Security > Query Access Manager).


Creating PS query through Query Access Manager in PeopleSoft

As I already mentioned that securing PS Query means securing the records used in it and before we do that we first have to identify which tree are we going to add our records into. For PeopleSoft HRMS the tree used for such purpose in most of the organization is 'QUERY_TREE_HR' but you can create your own tree depending upon your own requirement. Enter the tree name in the text box as shown in the screenshot above and hit on search. From the search result select the max effective dated row for the tree 'QUERY_TREE_HR' to open the updated one.


Adding queries into Query Security Tree in PeopleSoft

It opens the tree and the records currently added into it. But hold on, the records aren't added directly into the tree but into the Access Groups which is ultimately added into the tree. The Access Groups are nothing but entities into which similar records are added. There can be more than one Access Groups in a tree and also an Access Group can be added inside Another Access Group. In the image above, the access group 'HR ACCESS GROUP' which is also the root Access Group is highlighted.

Now we have to identify which Access Group we should add our records into ?
There is an easy trick for that if we don't know the desired Access Group. We can rather find out which Access Group other similar records are added and once we find that, ,we can add our record in to the same. So, just click on 'Find' link as pointed in above image to open the search page:


The record 'TEST_RECORD' entered above is the similar record for which we need to find the access group. Click on find and you will see the search results as below:


Well, the results shows that the record 'TEST_RECORD' is added into Access Group 'NEW_EXIT_REC_AG' which is added in the Access Group 'HR_ACCESS_GROUP' which is ultimately added in the tree 'QUERY_TREE_HR'.
Now we know that our record has to be added into the Access Group 'NEW_EXIT_REC_AG' so click on this group and then add the record into it. Click on the toolbar 'Insert Child Record' displayed right next to the Access Group name which will open the search page for the record that you wish to add. Enter the record name and then add it.


Set Access Group Permission:
I already mentioned earlier that securing a PS Query means securing the records added into it and at this point we have added these records into the appropriate tree. Now we have to add the tree (QUERY_TREE_HR) and it's Access Group (NEW_EXIT_REC_AG) into a permission list which then will be added to only those users profiles who are supposed to be able to access query 'TEST_QUERY_NEWHIRE'. 
Open the permission list definition into which you want to add the tree and access group, go to the tab 'Query' and click on the link 'Access Group Permissions' to open below page:
 
Adding Query Definition into Permission List in PeopleSoft

Finally, add this permission list into an appropriate role of the desired user's profile.


You can gain in-depth knowledge on PS Security with a live example. I have a complete session in 6 parts that covers all the aspects of PS Security


Below is the link to videos in YouTube.
PS Security

Click here to see the course contents
Click here to know how it works

However, if you want to save money by purchasing whole module instead of in parts then visit this page to get more details PeopleSoft Functional and technical online training

Creating the PS Query in PeopleSoft

Before I begin, I would like to mention that though this article is in the continuation to the article Creating Query Report with PS Query in PeopleSoft but it still give enough insight on how exactly a PS query is created in PeopleSoft.  
 
PS(PeopleSoft) Query is a tool to create simple as well as complex queries to extract the data from PeopleSoft tables. That been said, PS query is used extensively in creating Query Reports and it also serve as data source for other reporting tools like XML Publisher, nVision etc.. XML publisher is rather an advance reporting tool introduced in PeopleSoft.

For beginners or even those who are experienced though but haven't yet actually got their hands on the PS Queries it's quite difficult to deal with them so let's get down to it and create one for this requirement. 
To make it more simple, think of creating a PS query as creating a Select SQL in any of the SQL Editors (SQL Developer, Toad etc...). So, what are all the steps we do to create a select SQL:
  1. Identify Records
  2. Select Fields to be used
  3. Define Selection Criteria
  4. Define Having Criteria if any
  5. Finally run the Query
We do exactly all above steps to create a PS Query but in functional way. there are various pages, tabs and buttons that PeopleSoft has provided where we can perform all above tasks to create a PS Query.

Step 1: Identify Records 

Go to the navigation PeopleTools -> PS Query -> Query Manager and click on the link 'Create a New Query' to open below page:


 As shown in the image we have to add the records that are going to be used in the PS query. In our case the records would be JOB and NAMES hence, first search them and add in the list by clicking on 'Add Record' link shown in the screenshot. When the first record JOB is added followed by NAMES and if there is a possibility of join among them then PeopleSoft displays a link 'Join Record' which when clicked, the join criteria is automatically added into the query.


Once clicked on 'Join Record' link, below page will appear which will ask to choose another record with which the current record needs to be joined. Click on that record as shown below.


Step 2: Select the Fields

After the records have been added in the query, the next step is to identify the fields required to be displayed in the report. In our case the fields are - Employee ID, Name, Employee Record, Effective Date and Effective Sequence. Click on the 'Query' tab
to select the fields to be added from the added records as shown below:


Well, this tab is not just to select fields from the records but more than that. See the various join link on the right for instance the link 'Join DEPT_TBL' which enable us to join other records with the added records (JOB and NAMES in this case) based on the common occurrence of key fields across these records. For example, the records JOB and DEPT_TBL can be joined based on the existence of the field DEPTID in both tables and it being a key field in DEPT_TBL.
You can expand and collapse the list of fields for each record in this page. In the image above, we have selected all the required fields from JOB record and once done we will collapse it and expand the NAMES record to select the desired fields from that record. For our requirement we only have to select the field Name from NAMES record.


Step 3: Add the Criteria

So, we have done pretty much well so far. We have added records to be used in the query, fields to be displayed in the report and Joins wherever necessary. However, we can still add more records into the query and fields as well from the pages (in other word tabs) 'Records' and 'Query' respectively if needed. If you want to see the progress made in the query so far then go to the tab 'View SQL' where you will see the SQL resulted from the work done so far on this page.

So far we have just Joined the tables JOB and NAMES on the key field EMPLID but there are couple of more criteria yet to be added in order for the query to be able generate the accurate report and that can be done from the tab 'Criteria'. Click on this tab:


 It's little surprising that even though we haven't added any criteria till now, the three can be seen above. Well, it's not at all surprising because when we add a record which is effective dated into our PS Query, an effective dated criteria is automatically added. Since we have added JOB and NAMES record and since both are effective dated that's why two effective dated criteria have automatically been added into PS Query. But we can still delete the ones we don't need hence will go ahead and delete the effective dated criteria on JOB table (A.EFFDT). Another criteria on EMPLID is visible too because we had joined the JOB and NAMES record in the beginning.

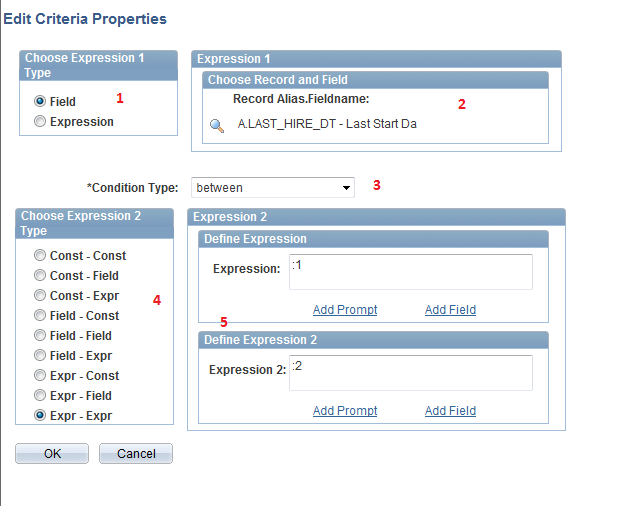
We still have to add one more criteria to make this query work for the requirement and that will be on the filed 'LAST_HIRE_DATE' which tracks the last hire date of employees.  Click on 'Add Criteria' button on top of this page.


Complete all the steps marked in red in sequence. Remember our goal here is to add the criteria 'WHERE A.LAST_HIRE_DT BETWEEN :1 AND :2' where :1 and :2 are bind variables for From Date and To Date respectively so that HRs can specify the date range during which the new hires have to be fetched into the report.Click on 'OK' and with this our PS Query will be completed.
In the cases where the reports are run by Cross Country users, the SQL resulted from this exercise will contain some row level security related criteria which will cause troubles. For more details visit - Removing Auto Generated Row Level Security Criteria from PS Query  


Step 4: Add Prompts

Though we are done with the SQL part of the PS Query, there are still couple of things we need to work on. Since we have used bind variables :1 and :2 which will read the dates specified by HRs during run time hence, we have to define the prompt fields which will enable HRs to enter Date range. Note that this particular part is specific to our requirement of Query Report which we are creating at the moment otherwise this step wouldn't be required. Click on 'Prompts' tab to open the Prompts page and then click on 'Add Prompt' Button.

Complete both the steps in sequence i.e first select the field which will take the input for From Date and then change the Heading Text to something more relevant and then click on 'OK'. Repeat the above two steps for To Date as well. Once done the prompts against each bind variable will be visible as shown below:
Lastly, we have to review the fields which are required to be displayed in the report whether they are in correct sequence - Employee ID, Name, Employee Record, Effective Date, Effective Sequence. Click on the tab 'Fields' to open the Fields page:


Clearly the order is not correct, we have to bring up the field 'Name' on the second place. Click on the button 'Reorder/Sort'
Reorder the fields as shown above and click on 'OK', the next thing you will see is the fields have been ordered correctly.
Finally save the query as 'TEST_QUERY_NEWHIRE'.

In The following article know how to secure PS Query - Security Configuration for PS Query or PeopleSoft Query Security
 

You can gain in-depth knowledge on PS Query with a live example by just paying below amount


I have a complete session in two parts which explains:

  1. How CI works - Overview, all the elements of CI etc..
  2. Creating an Inbound interface, that loads data on a multi level component using CI and App Engine
Below are the links to videos in YouTube.

PS Query Part 1
PS Query Part 2

Click here to know how it works

However, if you want to save money by purchasing whole module instead of in parts then visit this page to get more details PeopleSoft Functional and technical online training