Showing posts with label Core HR. Show all posts

Saturday, June 17, 2017

PeopleSoft Benefit Record Number Vs Employee Record Number

These two elements are always confusing especially for the person who isn't well versed with the Person Model.
The Employee record Number (ERN) is updated whenever a new assignment is created.The Benefit Record Number is defaulted to 0 to attach the new job with Benefit Record Number 0 but can be overridden to the particular number if it needs to be attached to that Benefit Record Number.

The Benefit Record Number is used by benefit module to track benefit entitlements of employees. Multiple Employee Records (EMPL_RCD) can be grouped under one Benefit Record Number.

Lets try to understand this with a very simple scenario.

Lets say a person is a professor in a college with Employee Record 0 and is eligible for various benefits so we assign the Ben Record Number as 0 to track his eligibility and enrollments in various benefit plans.

Lets say this person got appointed as a Dean of the same college after some time so a new job got created with Empl Record 1 but since this new job doesn't make him eligible for any new benefit program so we keep the Ben Record Number as 0.

But after sometime, lets say this person appointed as a physician also in the same college so we created a new job with Empl Record 2. However, this new job entitles him for an additional benefit program but can't be mixed with previous one so we assign ben record number for this new job as 1 for eligibility and enrollment of this employee under new benefit program.


Want to learn PeopleSoft Benefits module thoroughly? I have several videos with total duration of 12 hours.


Following is the link to the YouTube videos Benefits
Click here to see course contents

Click here to know how it works

However, if you want to save money by purchasing whole module instead of in parts then visit this page to get more details PeopleSoft Functional and technical online training

Monday, December 15, 2014

POI Security in PeopleSoft

Before you learn what POI security is, you must know how a POI is created and that has been explained in the following article - Adding and Maintaining Person Of Interest in PeopleSoft. Steps explained in Case 2 in the previous article show us how to create a POI without JOB record and we have created one too (EMPLID – ST01ST20).

PeopleSoft HRMS Online Training

Security for POIs without Jobs


Let’s try to supply some more details about this POI through the component “Maintain a Person’s POI Reltn”, this is also called maintaining POI relationship.

Open the component “Maintain a Person’s POI Reltn” (Navigation: Main -> Workforce Administration -> Personal Information -> Organizational relationships -> Maintain a Person’s POI Reltn), Enter the EMPLID – ST01ST20 then click on search. 


Oops, employee doesn’t exist?

The answer would rather be, Employee exists with POI type “AUS – Non Paid Intern” but the user who is trying to access it, doesn’t have access to the POI. It means that PeopleSoft secures POI’s data under the Security Set – PPLPOI (People without Jobs) and corresponding Security Type  hence users who doesn’t have access to this POI type won’t be able to see this POI.


Providing POI Access to Users


    Step 1: Get the permission list for row security tagged to the user from user profile page” (Navigation: Main -> PeopleTools -> Security -> User Profiles-> User Profile).


Step 2: Go to the “Security by Permission list” component (Navigation: Main -> Set Up HRMS > Security > Core Row Level Security > Security by Permission List)
a)      Give the row security permission list copied (Step :1) and open the details.
b)      Navigate to the security set – “PPLPOI” (People without jobs), as you can see below this permission list has access to none of the POI types.

Step 3:  Give the permission list access to the POI type “AUS-Non Paid Intern”

a)      Select the security access type “Person of Interest type” from the first prompt.
b)      Select the POI type (AUS-Non Paid Intern) from the second prompt and click on save.


       Step 4: Verify if the user now has access to the POI which we added (EMPLID – ST01ST20).
a)      Open the “Maintain a Person’s POI Reltn” component for this person (Navigation: Main -> Workforce Administration -> Personal Information -> Organizational relationships -> Maintain a Person’s POI Reltn)
b)      Enter the EMPLID – ST01ST20 and click on search, Now you would get a row for this person.
c)       Click on the row to open the component. 
 Done, access to this POI has been granted to the user.

Security for POIs with Jobs


POIs with JOB record are secured in the same way as EMP and CWR are secured, and it has been explained in other articles in detail. You might also want to visit Peoplesoft Row Level Security Search Records

Maintaining POI Relationships


We maintain the POI relationship through the component “Maintain a Person’s POI Reltn” (Navigation:  Main -> Workforce Administration -> Personal Information -> Organizational relationships -> Maintain a Person’s POI Reltn)
   From this component we can:
1)      Add additional security criteria by assigning the person to one or more business units, locations, or institutions.
To do this, add the corresponding business unit and location access types in the “Data” grid.
 

Now, the following user will have access to this POI:

  User A, who has access to the POI type “AUS-Non Paid Intern”
  User B, who has access to the POI type “AUS-Non Paid Intern” in the business unit “AUS01”
  User C, who has access to the POI type “AUS-Non Paid Intern” in the location “6100”

2)      We can mention the planned exit date for POI and couple of other information’s. 

Once we have mentioned the addition security criteria, we can grant access to the users on this POI at Business unit/Location level instead of POI type. To do this, follow the same steps given earlier in the para   Providing users with access to Person of Interest or POI types”.


As shown above, select security access type - POI Business Unit or POI Location, and depending upon this selection select the other keys (Key1, key2..etc).


You can gain in-depth knowledge on PS Security with a live example. I have a complete session in 6 parts that covers all the aspects of PS Security


Below is the link to videos in YouTube.
PS Security

Click here to see the course contents
Click here to know how it works

However, if you want to save money by purchasing whole module instead of in parts then visit this page to get more details PeopleSoft Functional and technical online training

Saturday, December 6, 2014

Creating an Organizational Relationship in PeopleSoft

I would like to mention here that we are in the process of hiring a person in PeopleSoft (Hiring a Person in PeopleSoft) and in this quest we have so far added the biographical details of the person through Add a Person component. We have a choice to stop here and save the transaction and the person will be saved as a POI Type without Job record. For more details on POI please visit Adding and Maintaining Person Of Interest in PeopleSoft


So the next step is to create an organizational relationship (or Organizational Instance) for this person. The Organization Relationship (Employment, Continent Worker  or POI) can be created in two ways:

  1. From 'Organizational Relationships' page of the component 'Add a Person'
  2. From the dedicated components Add an Employment Instance, Add a Contingent Worker Instance, Add a POI Instance to add EMP, CWR and POI instance respectively.
In the first method, we can create organizational relationship while adding biographical details of a person. We can also choose the checklist which has to be assigned to this person. We need to click on the button 'Add Relationship' which will open the 'Add Employment Instance' component.


How to add Organizational Relationship in PeopleSoft
The reason we are assigning checklist here, because as I mentioned in the beginning that we need to track the progress of the steps in the hiring process. More details on checklists is given in the following sections.

The second method is used in the cases when there is such a person for which we have the biographical details but we don't have organizational details yet so we just add person's biographical details through Add a Person component and then later on when we the organizational details are with us then we can add an organizational instance for that person. We will add the organizational instance Employee (Also called Employment Instance) for the person through method 1 so lets click on the button 'Add Relationship' after selecting 'Employee' check box and a Checklist. Note that if we choose to select the checklist in this page then we don't need to assign the checklist in the page 'Person Checklist' (Navigation: Main > WFA > Personal Information > Organizational Relationship > Person Checklist)

As soon as the button 'Add Relationship' is clicked, the Add Employment Instance page opens:


Work Location Tab


Add organizational details in Work Location Page in Job Data component in PeopleSoft

This page is essentially used to define the location where the employee is working like, Business unit, Reg Region, Department,  Location etc..
Well, I don't need to explain each and every field over here as their name suggest everything however, what I need to explain is the fields with which most of us are unfamiliar.
If the organization is using full position data management and if we assign a position number to the employee in this page then most of the fields across this component are auto filled from the Position Data page. For more details on this particular part visit - 'Override Position Data' and 'Use Position Data' Option in Job Data Page
.


Expected Job End Date Field

Almost all the organizations hire freshers and keep them on probation (for 1 year, 6 months, 3 months etc..)while they are going through training. So, at the time of hiring, HR users mention a date in this field which indicates that the employee will not be confirmed if he/she doesn't complete training (Probation) successfully by this date. 
Another example would be, the contractors who are working with an organization for a certain duration and their contract will be terminated after that so in this case, when these contractors are added, the HR users mention the expected job end date.


Job Information Tab

Adding Organizational details in Job Information Page in Job Data component

We use this page to add the details pertaining to Employee's job like whether its a part time or full time, regular or temporary, standard hours in a work period etc...
Again, most of the fields in this page are auto filled from the Position data and they are quite clear by their names however, I would like to explain few of them here:

Regular/Temporary and Full/Part Fields 

Visit this page to get the details on these fields - https://peoplesoftconcept.blogspot.com/2014/08/part-time-full-time-regular-temporary-and-contractor-in-peoplesoft.html

Standard Hours, Work Period and FTE fields

Visit this page to get the details on these fields - How the FTE is Calculated in PeopleSoft

Employee Class field

Visit this page to get the details on these fields -https://peoplesoftconcept.blogspot.com/2014/09/employee-class-emplclass-field-in.html

Contract Administraion


Visit this page to understand the Contract Administration in PeopleSoft - 

Payroll Tab


Adding payroll information in Payroll page in Job Data component


In this page we essentially add the payroll related information for the new hire such as Payroll System, Absence System. If organization has license for PeopleSoft delivered payroll and absence solution and if they are using them then we will make the choice here accordingly and based on this selection other details like Pay Group, Employee Type (Salaried or Hourly etc...) will be provided. One important thing to note here is, when we select Pay Group the Employee Type field is auto filled because in Pay Group setup page we mention the default Employee Type for which this pay group will be applicable.


Holiday Schedule Field

Every organization defines an holiday schedule every year for each country where their operation is,  where all the holidays falling in a particular year are added. For example, in India we have 10 holidays in a year. Once the schedule is defined, it is assigned to the employees through this field belonging to that country and then system takes these holidays in consideration during payroll processing. The holiday schedules are defined from Setup  HRMS > Product Related > WFA > Absence > Holiday Schedule Table


Salary Plan Tab


This page is typically used to define the Salary Administration Plan details like Sal Admin Plan ,Grade and Step. These fields are auto filled from position data if the details have been provided there. I have never used the section 'Military' so I won't be comfortable explaining it.

A grade can have different ranges of compensation in different geographies hence we always tie Salary Admin Plan with Grade.
For more details on Salary Admin Plan, Grade and Step visit -


Compensation Tab


This page is used to define compensation details for an employee. Nothing much to explain here, we just need to add the Pay Components for a Person in the Grid 'Pay Components' below. After that we must click on the button 'Calculate Compensation' to reflect the final compensation after calculation.

For example, in India we have various pay components:
  • Basic
  • HRA
  • Special Allowance
So, we will add a row for each of these pay component and the Comp Rate associated with it.
Once the compensation details are also provide, finally click on Save button to save the transaction and after the transaction is saved i.e the organization relationship is added for the person, the next step is to go through the remaining process.

Understanding PeopleSoft Checklists

We are in the process of hiring a person in PeopleSoft (Article - Hiring a Person in PeopleSoft) and so far we have added the person through Add a Person component and the organizational relationship through Add an Employment Instance component for this person. The information that we have provided have been stored in various tables but this is not the end of it. We Still have to do whole lot of other things to complete the hiring of this person.

PeopleSoft HRMS Online Training

As I mentioned in the beginning, there are various steps in hiring process or in other words, there are things need to be completed post joining such as:
  • Educational document submission and verification
  • Passport details
  • Relieving letter, Exp Letter Submission
  • Updating bank information
  • Updating Emergency Contact Details
  • Permanent Address Proof
  • Update Dependent/Beneficiary Details
But how do we keep track of these steps during hiring process ?
The answer is checklist. A checklist is nothing but list of items needed to be acted upon when assigned to a person.
We can create checklist for New Joiners, Transfers, Terminations, Contractors etc...
If you remember, we had assigned a checklist to this person when we were about to add organizational instance for this person. Thats the one way of doing it.
Another way is, don't assigned the checklist to person at the time of adding into PeopleSoft instead, assign the checklist after the person is added in which case we have to use Person Checklist page (Navigation: Main > WFA > Personal Information > Organizational Relationship > Person Checklist) both are same.
Now, since the checklist is already assigned lets open the Person Checklist page and see what are all the steps yet to be acted upon in the hiring process.


As you can see above, few steps are completed, few have been initiated while for others the required documents have been received and that's how we track the progress. The steps which are not yet completed such as Bank Information, Emergency Contact Details, HR can click on the link given and it will open the respective Page where the details has to be provided.

For example, If HR clicks on the link Emergency Contact Details, it will open the Emergency Contact page where the contact details can be provided.

Saturday, November 8, 2014

Understanding PeopleSoft Group IDs

How would you create Performance Document for the employees directly reporting to CEO ? How would you process a special bonus plan for those employees who have been rated as 2 during the annual performance evaluation process ?
Well, one way is to create an SQL query which will give list of such employees and then process each employee one by one. It's certainly gonna be  a long time taking process if such employees are higher in number. So what should we do then ?

If somehow, this SQL can be run dynamically on its own and pass in all the employee IDs which it returns, to the performance document creation process to create the performance document or to variable compensation application to process the special bonus for these employees then our problem will be solved and that's where Groups come in picture.

We create a group and define the population that belongs to this group. The population for a group is defined with the set of criteria with the respective records and their fields. We basically create a dynamic SQL but in functional way. So let's create a group which will contain the employees directly reporting to CEO.

Creating a Group in PeopleSoft involves following steps:
  1. Select Records, Fields and Values that will define the population for the group
  2. Define e Group
  3. Setup Group Security

There are various setup pages which we use to define Groups and we do the required setup and configuration through each of these pages in sequence:


Group Build Records and Fields

This page is available here: Main > Setup HRMS > Common Definitions > Group Build > Group Build Records and Fields Page.
As I mentioned earlier defining a group is nothing more than creating a dynamic SQL which requires records and fields to be used in WHERE clause of the SQL. Hence, we first need to identify the records and their fields that will be needed in the SQL to fetch the employees directly reporting to CEO and then we need to add them through this page.  Only the records and fields added here will be available to be used as criteria in Group Definition.
So in our case the only record we will be requiring is JOB and the fields will be - HR_STATUS, REG_REGION, REPORTS_TO, EFFDT, EFF_SEQ, PER_ORG


Group Definition - Group Profile

Main > Setup HRMS > Common Definition > Group Build > Group Build, Group Definition
This is the page where we actually define the group. We just add set of criteria in the group definition and these criteria fetch the population at run time.  One important thing to note here is that instead of adding criteria, a PS Query can also be added into the Group definition in which case the setup which we just did in the page 'Group Build Records and Fields' will not be required.
Following will be the criteria under WHERE clause that we need to add:

WHERE
EFFDT = (Max EFFDT Criteria)
REG_REGION = <Region>
HR_STATUS = 'A'
JOB_INDICATOR = 'P'
PER_ORG = 'EMPLID'
REPORTS_TO = <CEO Position Number>

I would show you how these criteria should be added with group definition through below screenshot:


Just match the criteria added through this page not all though, as shown in the above screenshot against the criteria written in the SQL earlier in the article. The items highlighted in Red are the logical operators we use in WHERE clause, the items highlighted in Green are the fields used in the WHERE clause, the items highlighted in blue are the field values for which employees are fetched from database.


Setting Up Group Security

Because you can group people together in any manner that suits your needs, including across companies or departments, groups have their own security structure that is separate from, and overrides, data permission security. For example, a user who does not normally have access to department 10100, but who has access to a group that includes people in department 10100, can see all group members, even those who belong to that department. This makes security factors an important consideration when you set up groups.

Following are the pages used for setting up Group Security:

Group Security Default:  Set Up HCM>Common Definitions>Group Build>Group Security Default
Specify which components in your system can use or refer to groups that are created in the Group Build component

Security By Group:  Set Up HCM>Common Definitions>Group Build>Security By Group
Specify the users who have security access to the selected group ID and the components that the user can access for the group

Security By Operator:  Set Up HCM>Common Definitions>Group Build>Security By Operator
Set up security by user. Specify the groups that the selected user can access and the components that the user can access for the group.  


Saturday, October 18, 2014

Process Security in PeopleSoft

During my entry level days whenever I used to define a process through process definition page (Navigation: PeopleTools > Process Scheduler > Process) I kind of remembered what values has to be provided for the fields to create a process definition hence I never payed attention to what is the significance of these fields in this page.

But very soon I started realizing how vital are these attributes especially in terms of process security and the following page drew my attention:

PeopleSoft HRMS Online Training


The highlighted area above decides which component the process will be run from and which group this process will belong to. In the image above the values provided to these two fields indicate that the process XRFWIN can only be accessed through the component System Process Request (PRCSMULTI) and belongs to the process group TLSALL. In order to prove this point, we have to exercise the process run.

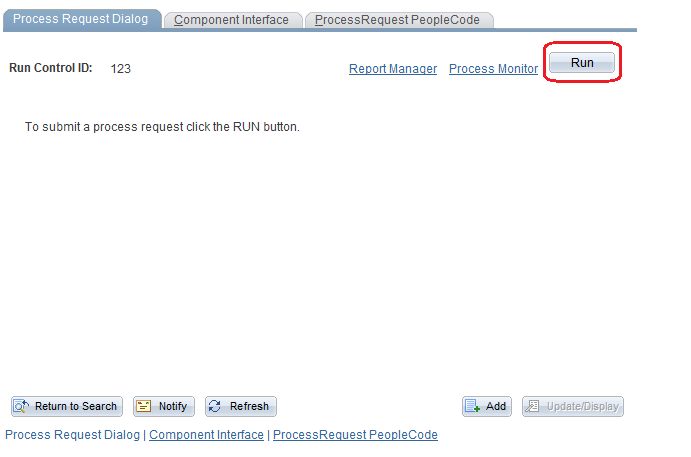
Open the System Process Request component from the navigation PeopleTools > Process Scheduler > System Process Request, give a Run Control ID and click on add. Following page will appear.


This is the System Process Request Page that we are talking about. Click on the button 'Run' which will take you to the process list page where you will see list of processes you have access to and from the list the desired process has to be chosen to run. As mentioned earlier you are able to access the process XRFWIN here because it's registered with the component PRCSMULTI (System Process Request).

You are able to see all the processes here when you hit the 'Run'  button because you probably are super user hence have access to the component System Process Request (PRCSMULTI) to which most of the processes (Interfaces, Reports etc...) are registered. Moreover, no Process Group is mentioned in the permission lists tagged to your OPRID which makes all the processes from all the groups visible to you provided they are registered with the component System Process Request.

But what if there is a country specific report to which only the respective HR should have access ?

That's where process security comes in play so let's first define what Process Security is.

Process Security in PeopleSoft

Its about securing process definitions so that users can't access and run the processes they aren't supposed to. Let's understand it with a live example.
Assume that you have been asked to develop 2 Core HR reports 'New Hires Report' and 'Terminations Report' meant for the UK HRs where UK is one of the regions where the company has operations. The tricky part of the requirement is, there are two HRs- HRA and HRB. HRA should have access to only 'New Hires Report' but HRB should have access to both.

This is how it's gonna be implemented:

Step 1: Develop the Reports
Develop the two reports PRCS_NHIR (New Hires Report) and PRCS_TER (Termination Report).

Step 2: Create Run control page from where they will be run
Create a run control page UKREPORTS to run these processes. Add fields on this page for providing input values for the report output if needed. Make sure that both the HRs - HRA and HRB have access to the run control page UKREPORTS which is nothing but a component. for more details on how to provide a page access visit - Simplified Way to Provide a Page Access in PeopleSoft

Step 3: Create process definition for both the reports.

PRCS_NHIR definition:


PRCS_TER definition:


Since the field 'Process Groups' is mandatory in this page so we have to provide some values here hence, mention the process group HRALL which means this process will be added into the process group HRALL.

Step 4: Assign the process group to a permission list
Create a new permission list or use an existing one from the page PeopleTools > Security > Roles and Permission Lists > Permission List. Go to the tab 'Process' and click on the link 'Process  Group Definition' to open the Process Group Definition page. Assign the Process group UKPRCSGROUP under which the report 'New Hires Report' has been defined. Save the permission list changes.


Step 5: Assign the Permission List to the user profile
Assign the permission list ADHOCUSER to an appropriate role assigned to the user HRA through user profile page (Nagivation: PeopleTools > User Profiles > User Profiles)

Summery:
Both the HRs have access to the run control page UKREPORTS and both the reports have been registered with this component but since the HR - HRA should have access to only one report 'New Hires Report' hence this report has been defined under a new process group UKPRCSGROUP. The HR - HRA then has been given access to this group through permission list definition. But no process group has been mentioned in the permission list definition for the HR - HRB hence it has access to both the reports.


You can gain in-depth knowledge on PS Security with a live example. I have a complete session in 6 parts that covers all the aspects of PS Security


Below is the link to videos in YouTube.
PS Security

Click here to see the course contents
Click here to know how it works

However, if you want to save money by purchasing whole module instead of in parts then visit this page to get more details PeopleSoft Functional and technical online training

Monday, September 29, 2014

Business Unit, Company and Regulatory Region in PeopleSoft

Over the time the three entities Business Unit, Company and Regulatory Region have always confused me as to how differently are they used when setting up the PeopleSoft HRMS system for any organization. I have read People books many times to understand them but believe me you will always run around the concept but never get to it unless you see a live scenario.

Related Articles:

How COBRA Act works in US


In nutshell, when PeoleSoft HRMS is setup the:
  • Business Units are defined from security standpoint
  • Companies are defined from the standpoint of how many subsidiaries, operations an organization has
  • Regulatory Regions are defined from the standpoint of what are all the regions with different rules and regulations are there in a particular country where the organization operates.

Assume there is an organization named XYZ Corporations. It operates in 4 countries with its 7 development centers across these 4 countries, 1 Business Services in US and 1 Technology Services in India.

Country                              Location                                        Type of Operation

USA                                   2 (Texas, Illinois)                             Development Center
USA                                   1 (California)                                   Business Services
CAN                                   2 (Ontario, Quebec)                         Development Center
IND                                    2 (Bangaloru ,Mumbai)                     Development Center
IND                                    1 (Chennai)                                      Technology Services
GBR                                   1 (London)                                       Development Center        


Let's look at how the Business Units, Regulatory Regions and Company will be defined while setting up PeopleSoft HRMS system for the XYZ Corporations.

Business Unit in PeopleSoft

As stated earlier Business Units are always defined from security standpoint. Though it might not be true in few cases but it is in most of them at least where I have worked so far. So, while defining Business Units for XYZ Corporations the main aspect which will be looked at is:

How the restriction to see the control data will be imposed on these locations?

The requirements are:
  1. The three locations in US shouldn't be able to see each others control data.
  2. One country shouldn't be able see the control data defined for another country.
So, based on the requirement and from security standpoint below will be the Business Unit setup:

Country                             Business Unit        Description         

USA                                   USA01                    Business Unit for Texas     
USA                                   USA02                    Business Unit for Illinois     
USA                                   USA03                    Business Unit for California       
CAN                                   CAN                       Business Unit for Canada        
IND                                    IND                        Business Unit for India      
GBR                                   GBR                       Business Unit for Great Britain       


There are three locations for XYZ Corporation in US hence to enforce data restrictions on each other, three Business Units - two (USA01, USA02) for the Development Centers in Texas and Illinois respectively and third (USA02) for the Business Services in California.  Likewise, three more business units - CAN, IND, GBR for Canada, India and Great Britain to ensure that the setup reflects the requirement.

Company in PeopleSoft

As stated in the beginning, Companies are defined from the standpoint of how many operations, subsidiaries an organization has across the globe. In our case the XYZ Corporations has operations in 4 countries, have two subsidiaries XYZ Business Services US and XYZ Technologies Services India hence the Company Setup would look like:

Country                            Company                        Company Name

USA                                   XUS                                XYZ US
USA                                   XBSU                              XYZ Business Services US
CAN                                   XCA                                XYZ Canada
IND                                    XIN                                 XYZ India
IND                                    XTSI                               XYZ Technology Services India
GBR                                   XUK                               XYZ UK   

Regulatory Region in PeopleSoft

In PeopleSoft, a regulatory region is considered any region with specific rules and regulations or more importantly the tax regulations. It can either be a country or specific parts in a country for example, in US tax regulation varies from state to state but in India its uniform all across the country so in the PeopleSoft context, for the country like US there will be as many regions as the number of states but for India there will be only one Region as there is only one tax regulation.
So assuming that the country US and Canada have varying tax regulations from their one state to another, accordingly the Regulatory Region setup will look like:

Country                            Reg Region                 Description  

USA                                   USA01                        USA Texas
USA                                   USA02                        USA Illinois
USA                                   USA03                        USA California
CAN                                   CAN01                       Canada Montreal
CAN                                   CAN02                       Canada Quebec
IND                                    IND                            India
GBR                                   GBR                           Great Britain   


Want to learn PeopleSoft Core HR module thoroughly? I have several videos with total duration of 12 hours.


Following is the link to the YouTube videos Core HR
Click here to see course contents

Click here to know how it works

However, if you want to save money by purchasing whole module instead of in parts then visit this page to get more details PeopleSoft Functional and technical online training