Saturday, December 6, 2014

Creating a Content Reference in PeopleSoft


In this article we going to learn how to create the navigation for the Query Report which we are talking about 
Since we now have the PS Query (TEST_QUERY_NEWHIRE) ready for the report. It's security configuration is also done so now we need to create a content reference in the portal from where the report will be run. Open the Query manager (PeopleTools > PS Query > Query Manager) again and search for the query that we have created:


Click on the link HTML as highlighted above, to open the run control page for this report in web browser:

Copy highlighted part of the URL displayed in the browser as shown above, and open the 'Structure and Content' page from the navigation - PeopleTools > Portal > Structure and Content. Go to the path Root > My Reports > Query Reports as shown below:


Click on the link 'Add Content Reference' as highlighted above to create a new content reference:


Paste the part of the URL which you copied from the browser in the beginning of this section and click on Save. The content reference is now created and with this everything is done. Now all we need to do is run the report. 

Security Configuration for PS Query in PeopleSoft

Before you learn how to secure PS Query, you must learn how to create a PS Query - Creating the PS Query in PeopleSoft

This is very important part in PS query development. It simply means that when we create PS query in PeopleSoft, we have to secure it so that only intended users can have access to it. Securing PS query means securing the records used in it by adding them into an appropriate tree and the records in our case are JOB and NAMES but since these are very common delivered records hence it is quite obvious that they would already have been used in other queries which means that they are already secured. We don't need to secure them but still its very important to understand that how exactly this is done.

Open the component 'Query Access Manager' (Navigation: PeopleTools > Security > Query Security > Query Access Manager).


Creating PS query through Query Access Manager in PeopleSoft

As I already mentioned that securing PS Query means securing the records used in it and before we do that we first have to identify which tree are we going to add our records into. For PeopleSoft HRMS the tree used for such purpose in most of the organization is 'QUERY_TREE_HR' but you can create your own tree depending upon your own requirement. Enter the tree name in the text box as shown in the screenshot above and hit on search. From the search result select the max effective dated row for the tree 'QUERY_TREE_HR' to open the updated one.


Adding queries into Query Security Tree in PeopleSoft

It opens the tree and the records currently added into it. But hold on, the records aren't added directly into the tree but into the Access Groups which is ultimately added into the tree. The Access Groups are nothing but entities into which similar records are added. There can be more than one Access Groups in a tree and also an Access Group can be added inside Another Access Group. In the image above, the access group 'HR ACCESS GROUP' which is also the root Access Group is highlighted.

Now we have to identify which Access Group we should add our records into ?
There is an easy trick for that if we don't know the desired Access Group. We can rather find out which Access Group other similar records are added and once we find that, ,we can add our record in to the same. So, just click on 'Find' link as pointed in above image to open the search page:


The record 'TEST_RECORD' entered above is the similar record for which we need to find the access group. Click on find and you will see the search results as below:


Well, the results shows that the record 'TEST_RECORD' is added into Access Group 'NEW_EXIT_REC_AG' which is added in the Access Group 'HR_ACCESS_GROUP' which is ultimately added in the tree 'QUERY_TREE_HR'.
Now we know that our record has to be added into the Access Group 'NEW_EXIT_REC_AG' so click on this group and then add the record into it. Click on the toolbar 'Insert Child Record' displayed right next to the Access Group name which will open the search page for the record that you wish to add. Enter the record name and then add it.


Set Access Group Permission:
I already mentioned earlier that securing a PS Query means securing the records added into it and at this point we have added these records into the appropriate tree. Now we have to add the tree (QUERY_TREE_HR) and it's Access Group (NEW_EXIT_REC_AG) into a permission list which then will be added to only those users profiles who are supposed to be able to access query 'TEST_QUERY_NEWHIRE'. 
Open the permission list definition into which you want to add the tree and access group, go to the tab 'Query' and click on the link 'Access Group Permissions' to open below page:
 
Adding Query Definition into Permission List in PeopleSoft

Finally, add this permission list into an appropriate role of the desired user's profile.


You can gain in-depth knowledge on PS Security with a live example. I have a complete session in 6 parts that covers all the aspects of PS Security


Below is the link to videos in YouTube.
PS Security

Click here to see the course contents
Click here to know how it works

However, if you want to save money by purchasing whole module instead of in parts then visit this page to get more details PeopleSoft Functional and technical online training

Creating the PS Query in PeopleSoft

Before I begin, I would like to mention that though this article is in the continuation to the article Creating Query Report with PS Query in PeopleSoft but it still give enough insight on how exactly a PS query is created in PeopleSoft.  
 
PS(PeopleSoft) Query is a tool to create simple as well as complex queries to extract the data from PeopleSoft tables. That been said, PS query is used extensively in creating Query Reports and it also serve as data source for other reporting tools like XML Publisher, nVision etc.. XML publisher is rather an advance reporting tool introduced in PeopleSoft.

For beginners or even those who are experienced though but haven't yet actually got their hands on the PS Queries it's quite difficult to deal with them so let's get down to it and create one for this requirement. 
To make it more simple, think of creating a PS query as creating a Select SQL in any of the SQL Editors (SQL Developer, Toad etc...). So, what are all the steps we do to create a select SQL:
  1. Identify Records
  2. Select Fields to be used
  3. Define Selection Criteria
  4. Define Having Criteria if any
  5. Finally run the Query
We do exactly all above steps to create a PS Query but in functional way. there are various pages, tabs and buttons that PeopleSoft has provided where we can perform all above tasks to create a PS Query.

Step 1: Identify Records 

Go to the navigation PeopleTools -> PS Query -> Query Manager and click on the link 'Create a New Query' to open below page:


 As shown in the image we have to add the records that are going to be used in the PS query. In our case the records would be JOB and NAMES hence, first search them and add in the list by clicking on 'Add Record' link shown in the screenshot. When the first record JOB is added followed by NAMES and if there is a possibility of join among them then PeopleSoft displays a link 'Join Record' which when clicked, the join criteria is automatically added into the query.


Once clicked on 'Join Record' link, below page will appear which will ask to choose another record with which the current record needs to be joined. Click on that record as shown below.


Step 2: Select the Fields

After the records have been added in the query, the next step is to identify the fields required to be displayed in the report. In our case the fields are - Employee ID, Name, Employee Record, Effective Date and Effective Sequence. Click on the 'Query' tab
to select the fields to be added from the added records as shown below:


Well, this tab is not just to select fields from the records but more than that. See the various join link on the right for instance the link 'Join DEPT_TBL' which enable us to join other records with the added records (JOB and NAMES in this case) based on the common occurrence of key fields across these records. For example, the records JOB and DEPT_TBL can be joined based on the existence of the field DEPTID in both tables and it being a key field in DEPT_TBL.
You can expand and collapse the list of fields for each record in this page. In the image above, we have selected all the required fields from JOB record and once done we will collapse it and expand the NAMES record to select the desired fields from that record. For our requirement we only have to select the field Name from NAMES record.


Step 3: Add the Criteria

So, we have done pretty much well so far. We have added records to be used in the query, fields to be displayed in the report and Joins wherever necessary. However, we can still add more records into the query and fields as well from the pages (in other word tabs) 'Records' and 'Query' respectively if needed. If you want to see the progress made in the query so far then go to the tab 'View SQL' where you will see the SQL resulted from the work done so far on this page.

So far we have just Joined the tables JOB and NAMES on the key field EMPLID but there are couple of more criteria yet to be added in order for the query to be able generate the accurate report and that can be done from the tab 'Criteria'. Click on this tab:


 It's little surprising that even though we haven't added any criteria till now, the three can be seen above. Well, it's not at all surprising because when we add a record which is effective dated into our PS Query, an effective dated criteria is automatically added. Since we have added JOB and NAMES record and since both are effective dated that's why two effective dated criteria have automatically been added into PS Query. But we can still delete the ones we don't need hence will go ahead and delete the effective dated criteria on JOB table (A.EFFDT). Another criteria on EMPLID is visible too because we had joined the JOB and NAMES record in the beginning.

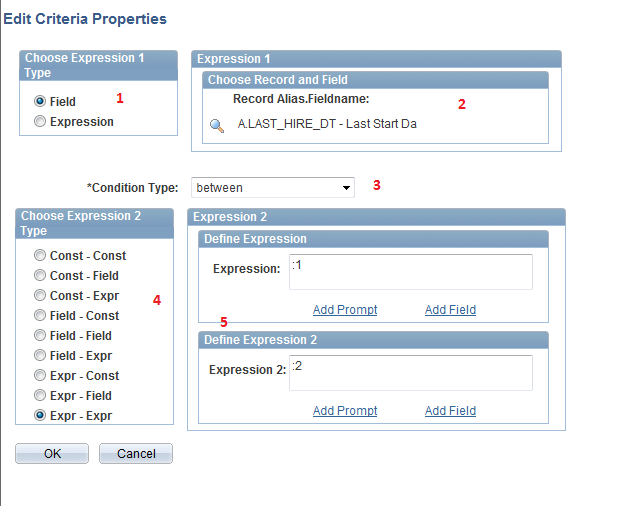
We still have to add one more criteria to make this query work for the requirement and that will be on the filed 'LAST_HIRE_DATE' which tracks the last hire date of employees.  Click on 'Add Criteria' button on top of this page.


Complete all the steps marked in red in sequence. Remember our goal here is to add the criteria 'WHERE A.LAST_HIRE_DT BETWEEN :1 AND :2' where :1 and :2 are bind variables for From Date and To Date respectively so that HRs can specify the date range during which the new hires have to be fetched into the report.Click on 'OK' and with this our PS Query will be completed.
In the cases where the reports are run by Cross Country users, the SQL resulted from this exercise will contain some row level security related criteria which will cause troubles. For more details visit - Removing Auto Generated Row Level Security Criteria from PS Query  


Step 4: Add Prompts

Though we are done with the SQL part of the PS Query, there are still couple of things we need to work on. Since we have used bind variables :1 and :2 which will read the dates specified by HRs during run time hence, we have to define the prompt fields which will enable HRs to enter Date range. Note that this particular part is specific to our requirement of Query Report which we are creating at the moment otherwise this step wouldn't be required. Click on 'Prompts' tab to open the Prompts page and then click on 'Add Prompt' Button.

Complete both the steps in sequence i.e first select the field which will take the input for From Date and then change the Heading Text to something more relevant and then click on 'OK'. Repeat the above two steps for To Date as well. Once done the prompts against each bind variable will be visible as shown below:
Lastly, we have to review the fields which are required to be displayed in the report whether they are in correct sequence - Employee ID, Name, Employee Record, Effective Date, Effective Sequence. Click on the tab 'Fields' to open the Fields page:


Clearly the order is not correct, we have to bring up the field 'Name' on the second place. Click on the button 'Reorder/Sort'
Reorder the fields as shown above and click on 'OK', the next thing you will see is the fields have been ordered correctly.
Finally save the query as 'TEST_QUERY_NEWHIRE'.

In The following article know how to secure PS Query - Security Configuration for PS Query or PeopleSoft Query Security
 

You can gain in-depth knowledge on PS Query with a live example by just paying below amount


I have a complete session in two parts which explains:

  1. How CI works - Overview, all the elements of CI etc..
  2. Creating an Inbound interface, that loads data on a multi level component using CI and App Engine
Below are the links to videos in YouTube.

PS Query Part 1
PS Query Part 2

Click here to know how it works

However, if you want to save money by purchasing whole module instead of in parts then visit this page to get more details PeopleSoft Functional and technical online training

Saturday, November 29, 2014

Setting up Approval Process in PeopleSoft Approval Workflow Engine (AWE)

Being part of an organization which houses its HRIS system in PeopleSoft, we as an employee do various  Self Service transactions like submit a planned leave request for a week or so which then goes to manager for their approval and upon final approval the database changes are done eventually. Let's talk about a typical transfer process which involves certain steps. Assume a manager raises a transfer request for one of their direct reports. The request is routed through a series of approval involving following stakeholders:
  1. N+2 (Requester's Manager)
  2. N+3 (Manager's Manger)
  3. HR Head

The transfer request goes through following steps:

  1. Manager raises the request for one of it's direct reports using Transfer Employee component (MSS > Job and Personal Information > Transfer Employee).
  2. The component Transfer Employee checks whether approval is required for this transaction from the page Workflow Configuration (Setup HRMS > Common Definition > Self Service > Workflow Configuration) then checks what approval process is attached with this transaction from the page Workflow Transactions (Setup HRMS > Common Definitions > Approvals > Workflow Transactions) If the approval is required then it submits the transaction to AWE.
  3. AWE identifies the approval process definition passed by transaction component, reviews the process setup from Approval Process Setup page (Setup HRMS > Common Definitions > Approvals > Approval Process Setup) to determine the next approver in the approval chain.
  4. AWE then checks whether email notifications have been configured for this approval process from the page Transaction Configuration (Setup HRMS > Common Definitions > Approvals > Transaction Configuration)  and then determines what should be the mode of communication (Email or Worklist or Both) to the next approver. It then notifies next approver accordingly and updates the Header Record (HR_TRANSFER_DAT) and Cross Reference Table (HR_TRANSFER_XREF) through the 'Approval Event Handler Class' all mentioned in the Transaction Registry Page (Setup HRMS > Common Definitions > Approvals > Transaction Registry).
  5. Approver approves the transfer request which came from previous steps, through the page Approve Transfers (MSS > Job and Personal Information > Approve Transfer) upon which AWE again updates all the records mentioned in the step 4.
  6. Step 4 and Step 5 are repeated until request has been approved by all the approvers.
  7. Once the request is approved by all the approvers , HR Admin opens the page Employee Transfer Requests (Workforce Administration > Self Service Transactions > Employee Transfer Requests), select appropriate option and click on 'Save' which ultimately updates the database i.e adds a transfer row in Job Data component.

Things are quite clear so far but one question arises here, What is this Approval Workflow Engine (AWE) that I just mentioned about in the above transfer business process ?
As it's name suggests, Its an engine which drives an approval process of different kinds. It provides capabilities creating, running and managing approval processes.

Well, as I always say the best way to learn something in PeopleSoft is to do a hands on. So lets get into some real business and see how exactly an approval process is setup with AWE in PeopleSOft. The requirement is to create an approval process which we saw in the beginning in AWE. This process will include following roles in the approval chain:
  1. N+2 (Originator's Manager where originator itself is a manager)
  2. N+3 (Manager's Manager)
  3. HR Head
Most of us who are not much familiar with AWE might think that doing the setup and configuration in AWE is all it takes to implement an entire approval process in PeopleSoft but let me tell you there are whole lot of other things that has to be done before we could even touch the AWE setup part. Having said that, following are the three major parts in this entire implementation:


The elements highlighted in red in above diagrams are the ones we actually need to create however, their names have been given from the perspective of a transfer process that we are going to setup. But you can give your own name which suits your needs best.

In the following articles I will explain each of these steps to setup a transfer approval process.

Wednesday, November 26, 2014

How to use PeopleSoft ExceltoCI Utility

Before reading this article you must understand the basics of component interface Understanding Componenet Interface in PeopleSoft

When a business is run through PeopleSoft or in any other enterprise application for that matter and if you are providing PeopleSoft support to that business, you get endless requirements of different kind as part of your work. I would like to bring up an example of the two requirements to upload the data in PeopleSoft system.
  1. The first requirement is to upload the fringe benefit tax information sent by third party system into PeopleSoft on daily basis.
  2. The second requirement is to upload 200 promotions in the system through Job Data component.
How do you think these requirements can be catered to. Well, whenever we hear upload word in PeopleSoft the first think which comes in mind is Component Interface (CI) but can both of the above requirements be catered through CI ?

The answer would be yes because after all its about upload and with the CI being so powerful tool there is no deny to it but if you observe closely, there is a basic difference between these two requirements and that is - the first one is a daily upload activity but the second one is a one time upload activity. Hence, its quite obvious that for first requirement we will be creating the CI of the target component where Fringe Benefit Tax information is gonna be stored and call this CI from a new Application Engine program which can be scheduled as a process on daily basis.
But what about second one ? should we really create an entire Application Engine which would work in conjunction with CI when its a one time exercise ?
I would simply say No ..! we should rather be using Excel to CI (ExceltoCI) utility to do the same however, in this case also we need to create CI for target component.

PeopleSoft Excel to CI or ExceltoCI is a Microsoft excel based application which is used to upload the data from Microsoft Excel workbook to PeopleSoft system. So basically, Excel to CI tool will take the data as input in excel format and pass it to CI which will ultimately load the data into database through underlying component. 

There are four simple steps to be followed in order to configure the ExceltoCI (Excel to CI) tool and then load the data through it.

Before we begin, first we need to get this utility either from someone who already have it or from the PeopleSoft directory <PS_HOME>/excel. Once you have it with you, just open it. You will see 5 tabs in this excel as shown below and it also represents 4 step process in ExceltoCI utility:


As mentioned earlier, its a four step process:

  1. Connection
  2. Template
  3. Data Input
  4. Staging and Submission
Lets follow above mentioned steps and see how exactly this utility works.

Connection

First we need to establish connection between ExceltoCI utility and the desired component interface (CI) and to begin with, first open the target PeopleSoft instance into which you wish to upload the data. Let's assume that instance name is HCMDEV so open it in the web browser and copy different element of the URL displayed in the web browser. We will be using these elements to establish connection between ExceltoCI and  the CI. Go to the 'Connection Information' tab at the bottom of the ExceltoCI utility and paste copied elements as shown below:


Its quite clear with the highlighted colors that which element from URL needs to be copied where in the Connection Information page.  There are couple of things I would like to point out here:
If the protocol is https then the HTTP Port would be 443 but if the protocol is http then HTTP Port will be 80. The field Action dictates whether a new row will be created through the component or an existing one will be updated similar to what we do in correct history mode.
Leave rest of the fields as shown above.

Template

This is the step where we select the CI through which the data is going to be uploaded. Click on the tab Template as below:


Enter the User ID, Password  and the CI name (For example 'CI_JOB_DATA') as shown above and then click on OK. It will open the CI definition:


Our goal here is to select all the required fields from the component interface which are mandatory in order for the transaction to be saved. For example, if we are intending to add promotion rows for employees then we will be requiring EMPLID, EMPL_RCD, EFFDT, EFFSEQ, ACTION, ACTION_REASON, POSITION_NBR etc...  The field selection here will be based on what are all the fields need to be filled in when promotion row is added through Job Data component in PIA. Highlight the field you want to select and then click on the option 'Select Input Cell' at the top. Do the same for all the fields and finally click on the option 'New Data Input' available on the top which will open the Data Input page.


Data Input


All the selected fields have been displayed in this page and since they might be at different levels in the component hence they are shown in different colors as shown above. 
Till now, we established connection, created template for the CI and selected the input fields. Now we are all set to fill in these selected fields with input data that we are planning to upload into the database. 
Add all the input data rows in excel form and click on the option 'Stage Data for Submission' available on the top which will open the next page.

Staging and Submission


In this page you will also see errors and warnings generated by the underlying component. All the errors needs to be fixed before the data can be submitted further but the warnings can be ignored. Once all the errors are fixed then click on the option 'Submit' displayed on the top which will finally load the data into database.


You can gain in-depth knowledge on CI with a live example by just paying below amount


I have a complete session in two parts which explains:

  1. How CI works - Overview, all the elements of CI etc..
  2. Creating an Inbound interface, that loads data on a multi level component using CI and App Engine
Below are the links to videos in YouTube.

CI Part 1
CI Part 2

Click here to know how it works

However, if you want to save money by purchasing whole module instead of in parts then visit this page to get more details PeopleSoft Functional and technical online training

Saturday, November 8, 2014

Understanding PeopleSoft Group IDs

How would you create Performance Document for the employees directly reporting to CEO ? How would you process a special bonus plan for those employees who have been rated as 2 during the annual performance evaluation process ?
Well, one way is to create an SQL query which will give list of such employees and then process each employee one by one. It's certainly gonna be  a long time taking process if such employees are higher in number. So what should we do then ?

If somehow, this SQL can be run dynamically on its own and pass in all the employee IDs which it returns, to the performance document creation process to create the performance document or to variable compensation application to process the special bonus for these employees then our problem will be solved and that's where Groups come in picture.

We create a group and define the population that belongs to this group. The population for a group is defined with the set of criteria with the respective records and their fields. We basically create a dynamic SQL but in functional way. So let's create a group which will contain the employees directly reporting to CEO.

Creating a Group in PeopleSoft involves following steps:
  1. Select Records, Fields and Values that will define the population for the group
  2. Define e Group
  3. Setup Group Security

There are various setup pages which we use to define Groups and we do the required setup and configuration through each of these pages in sequence:


Group Build Records and Fields

This page is available here: Main > Setup HRMS > Common Definitions > Group Build > Group Build Records and Fields Page.
As I mentioned earlier defining a group is nothing more than creating a dynamic SQL which requires records and fields to be used in WHERE clause of the SQL. Hence, we first need to identify the records and their fields that will be needed in the SQL to fetch the employees directly reporting to CEO and then we need to add them through this page.  Only the records and fields added here will be available to be used as criteria in Group Definition.
So in our case the only record we will be requiring is JOB and the fields will be - HR_STATUS, REG_REGION, REPORTS_TO, EFFDT, EFF_SEQ, PER_ORG


Group Definition - Group Profile

Main > Setup HRMS > Common Definition > Group Build > Group Build, Group Definition
This is the page where we actually define the group. We just add set of criteria in the group definition and these criteria fetch the population at run time.  One important thing to note here is that instead of adding criteria, a PS Query can also be added into the Group definition in which case the setup which we just did in the page 'Group Build Records and Fields' will not be required.
Following will be the criteria under WHERE clause that we need to add:

WHERE
EFFDT = (Max EFFDT Criteria)
REG_REGION = <Region>
HR_STATUS = 'A'
JOB_INDICATOR = 'P'
PER_ORG = 'EMPLID'
REPORTS_TO = <CEO Position Number>

I would show you how these criteria should be added with group definition through below screenshot:


Just match the criteria added through this page not all though, as shown in the above screenshot against the criteria written in the SQL earlier in the article. The items highlighted in Red are the logical operators we use in WHERE clause, the items highlighted in Green are the fields used in the WHERE clause, the items highlighted in blue are the field values for which employees are fetched from database.


Setting Up Group Security

Because you can group people together in any manner that suits your needs, including across companies or departments, groups have their own security structure that is separate from, and overrides, data permission security. For example, a user who does not normally have access to department 10100, but who has access to a group that includes people in department 10100, can see all group members, even those who belong to that department. This makes security factors an important consideration when you set up groups.

Following are the pages used for setting up Group Security:

Group Security Default:  Set Up HCM>Common Definitions>Group Build>Group Security Default
Specify which components in your system can use or refer to groups that are created in the Group Build component

Security By Group:  Set Up HCM>Common Definitions>Group Build>Security By Group
Specify the users who have security access to the selected group ID and the components that the user can access for the group

Security By Operator:  Set Up HCM>Common Definitions>Group Build>Security By Operator
Set up security by user. Specify the groups that the selected user can access and the components that the user can access for the group.  


Monday, November 3, 2014

Removing Auto Generated Row Level Security Criteria from PS Query

We have already seen how a PS Query is created through PIA in PeopleSoft in the following article - Creating Query Report with PS Query in PeopleSoft.
When we create a PS query which involves those records that has employee ID field then we see System automatically adds a row level security criteria in the generated SQL which prevents unauthorized access to the employee data. Ideally speaking, this extra security measure is indeed very significant because otherwise, everybody can access everything through PS Query. However, this additional security measure can sometimes prove to be hurdle in the way and apparently I have dealt with such an hurdle once upon a time.

There was a requirement where we had to create a ePerformance report that would generate list of employees who have gone in an assignment to UK from India and the performance document has been created for them. Well, so far there wasn't any issue though until we realized that the report should be accessible to India HR only.We got down to work and created such a report using PS Query but when we ran it as HR it didn't fetch any employee.

We were surprised to see that and were very curious to know what went wrong. We then opened the PS Query definition through Query Manager and checked the generated SQL:
The highlighted area above is the real culprit which is preventing the HR to see those employee's data who went to UK for assignments. Let me put it in another way -
The HR is of the region IND and the employee they are trying to fetch the details are now of the region GBR because they have gone to UK for assignment and since HR is not authorized to see the cross country information hence system has automatically joined row level security search records PS_EMPLMT_SRCH_QRY and PS_PERALL_SEC_QRY in the query appropriately to prevent the potential unauthorized access and it cannot be deleted from the PS Query.

So what are we gonna do now because we want that the India HR should be able to get the report on UK employees, here is the solution.
  1. Instead of creating a PS Query, first create a view (For Example - EPERF_DATA_VW) from the same records and the same SQL you have used in the PS Query that will fetch the desired employees.
  2. then create the PS Query (EPERF_REPORT) from this View EPERF_DATA_VW.
  3. Finally create the report from the PS Query EPERF_REPORT.
Check if the issue has been resolved.